
Nokia 2720 V user manual is an easy and uncomplicated manual. It provides information about all the features and settings available on the phone.

What’s the first thing you do with your newly purchased cellphone? Obviously, you’re going to want to turn it on immediately. Countless features are just waiting to be explored.
But with some phones, such as the Nokia 2720 V flip phone, you’re going to need extra assistance. Discovering a new phone can be exciting at first, but it’s important to get to know its specifications.
In this world of advanced cellphones, a little help will go a long way. This is what user manuals are designed for. These documents include information to elevate your phone’s features.
Stick around and find out more in this exclusive Nokia 2720 V flip phone user manual summary. You’ll be surprised at the new knowledge you’ll learn from it.
Page Contents:
Get started
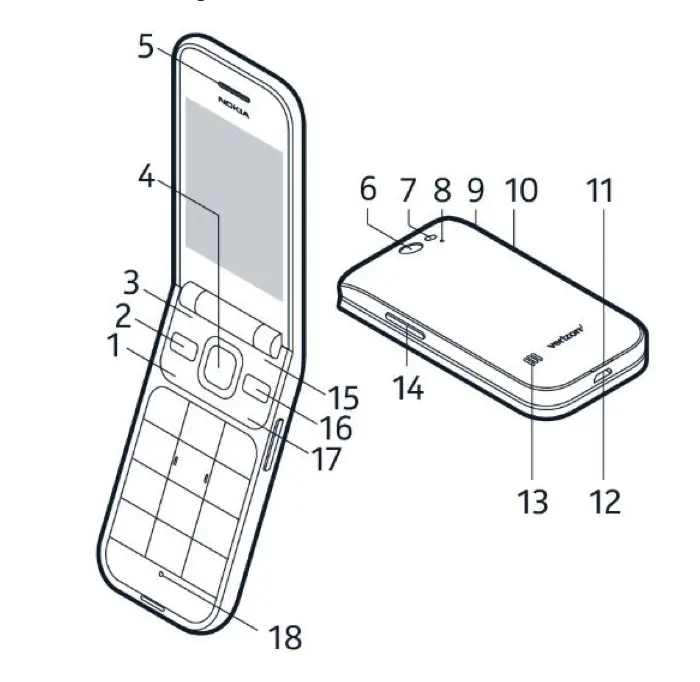
- Call button
- Shortcut button
- Left selection button
- Scroll button
- Earpiece
- Camera
- Flash
- Microphone
- Headset connector
- SOS call/Google Assistant button. If you have set the accessibility mode on, this button sends an SOS call. Otherwise, the button switches Google Assistant on.
- Back cover opening slot
- USB connector
- Loudspeaker
- Volume buttons
- Right selection button
- Back button
- Power/End button
- Microphone
Do not connect to products that create an output signal, as this may damage the device. Do not connect any voltage source to the audio connector. If you connect an external device or headset, other than those approved for use with this device, to the audio connector, pay special attention to volume levels.
Some of the accessories mentioned in this user guide, such as charger, headset, or data cable, may be sold separately.
Read also: Verizon eTalk Flip Phone Manual
Charge your phone
- Insert the small end of the USB cable into the phone.
- Insert the larger end into the charger and plug it into an outlet.
Your phone supports the USB Micro-B cable. You can also charge your phone from a computer with a USB cable, but it may take a longer time.
If the battery is completely discharged, it may take several minutes before the charging indicator is displayed.
Warning: Only use approved chargers with your device. Incompatible chargers or tampering with the charger port could damage your device and void the warranty.
Turning your phone on/off
Note: The first time you turn on your phone, you will need to activate it. See the Get started guide included with your phone.
To turn your phone on, press and hold the Power/End button until the phone vibrates.
To turn your phone off, press and hold the Power/End button and select Power Off.
Protect your phone
If you want to avoid accidentally making a call when your phone is in your pocket or bag, you can lock your buttons and screen.
To lock your buttons and screen, press and hold the Power/End button and select Lock, or close the fold.
To unlock the buttons and screen, select Unlock, or open the fold.
Set a Screen Lock
You can set the phone to ask for a screen lock code.
- Press the scroll button and select Settings.
- Scroll right to Privacy & Security.
- Select Screen Lock > Screen Lock > On, and create a four-digit code. Note, however, that you need to remember the code you created, as Verizon wireless is not able to open or bypass it.
Battery life
To save power:
- Always charge the battery fully.
- Mute unnecessary sounds, such as keypad sounds.
- Use wired headphones, rather than the loudspeaker.
- Set the phone screen to switch off after a short time.
- Lower the screen brightness.
- When applicable, use network connections, such as Bluetooth, selectively: switch the connections on only when you are using them.
Read also: Kyocera DuraXA Equip User Manual
Accessibility mode
With the accessibility mode, the text on the phone display is bigger, the alerts louder, and the Google Assistant button turns into an SOS call button.
If you didn’t switch the accessibility mode on when setting up your phone, press the scroll button, and select Settings > Device > Accessibility Mode > On.
Add Your ICE Details
To be able to make SOS calls, you need to add your ICE (In Case of Emergency) details. To add your personal details, press the scroll button, and select Settings > Device > ICE information.
To define the contacts to whom the SOS call is made, press the scroll button, and select Settings > Device > ICE information > Options > Create ICE contacts. Note that you cannot use official emergency call numbers as your ICE contacts.
Make an SOS Call
Once you have the accessibility mode switched on and added an ICE contact, you can make SOS calls. To make the call, press and hold the SOS call button for three seconds, or press the SOS call button quickly twice.
The phone calls your first ICE contact. If the contact doesn’t answer in 25 seconds, the phone calls the next contact, and keeps calling your contacts 10 times until one of them answers the call, or you press the end button.
Note: When the SOS call is answered, the phone goes to handsfree mode. Do not hold the phone close to your ear, as the volume may be very loud.
Send an SOS Message
You can select to send an SOS message if no one answers your SOS call. Press the scroll button and select Settings > Device > Accessibility Mode > On > SOS Call > SOS Message > On.
To edit the pre-defined message, select SOS Message > Edit.
Tip: If you want to keep the accessibility mode on, but don’t want to make SOS calls, press the scroll button, and select Settings > Device > Accessibility Mode > SOS Call > Off.
Google Assistant
Google Assistant can help you search information online, translate words and sentences, make notes and calendar appointments, for example.
If you have not switched on the accessibility mode, the SOS call button works as the Google Assistant button.
To use Google Assistant, press and hold the Google Assistant button for three seconds, and follow the instructions on the display.
Download user manual
That is all the summary of Nokia 2720 V flip phone user manual. Do not hesitate to open this manual if you are in confusion while using your phone. We believe this user manual is helpful. Click the link we provide to download the full document.
Download: Nokia 2720 V User Manual (PDF)