
When it comes to exploring a new-brand device, we all need some help. Reading the Orbic Journey V flip phone user manual will help you to find out all of the important instructions.

Most people think by having a basic phone like the Orbic Journey V, a user manual is unnecessary. However, you still need some guidance to explore your new phone to prevent any misuse or discover hidden features that are available to your phone.
The user manual isn’t there for entertainment purposes. It comes more than that. With this document, you can have a better configuration of the device. It will also show you how to maintain the device for a long-last lifetime.
No more words. Here is a brief article of the Orbic Journey V (RC2200L) flip phone user manual. We hope you will get better insights into the device. It is very comfortable to read since it comes with understandable explanations.
Page Contents:
Getting Started
It is time to know and start the Orbic Journey V. The first chapter of the user manual contains technical information to make you more familiar with the device. It provides the layout of the phone complete with its diagrams and explanations.
After that, you will get information about how to take care of your battery properly. You will get some tips to extend and improve the battery life. This chapter will also bring you to explore the home screen by explaining some status bars’ icons.
Device Overview
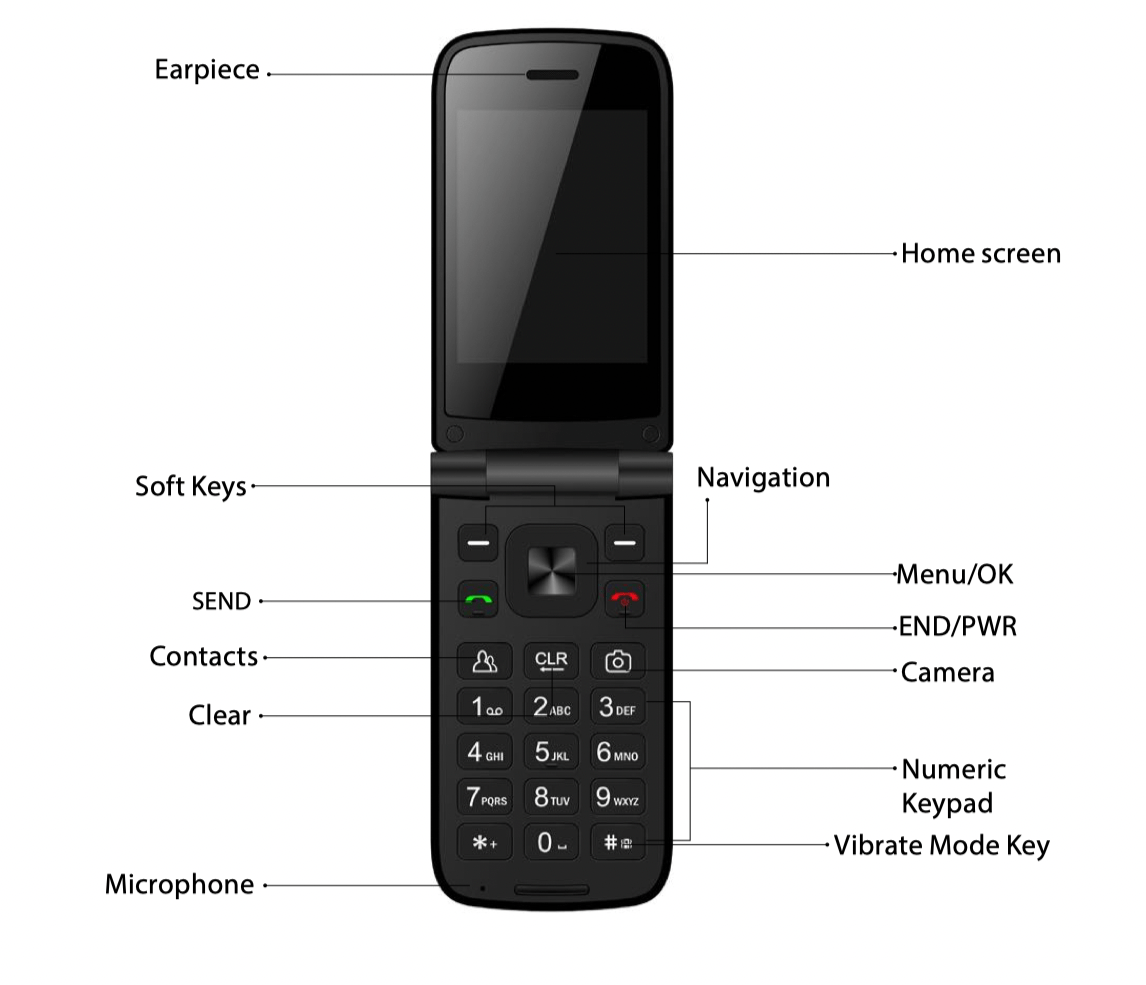
Earpiece: Allows you to hear the caller and automated prompts.
Softkeys: Allows you to select the corresponding command at the lower left or right displayed on the screen.
Send Key: Allows you to make and answer calls. Press from standby mode to access your call history (all calls, missed calls, dialed calls, and received calls).
Contacts: Access the contacts list.
Clear Key: Quick press deletes spaces and characters | hold to delete entire text entry | press to back out of menus, one level at a time.
Microphone: Transmit your voice to the caller or for voice-activated functions (e.g., Voice commands).
Navigation Key: To scroll through menu items and highlight fields or objects
Menu/OK: To select options and menu options
End/Power Key: Turns the power on/off, end calls, and exits menus. Also returns to the home screen.
Camera: Allows you to access the camera.
Numeric Keypad: From the home screen pressing numeric keys allows access to default shortcuts. Keys will also allow entering phone numbers and alphabetical text.
Vibrate mode key: Allows you to set Vibrate mode from standby mode (the Home screen), press and hold for about 3 seconds.
Homescreen: Displays messages, indicator icons, and active functions.

USB/Charger Port: Connects the phone to the USB charger, or other compatible accessories.
Volume Key: Allows you to adjust the volume.
Headset Jack: Allows you to plug in an optional 3.5mm headset for convenient, hands-free conversations or other compatible listening devices.
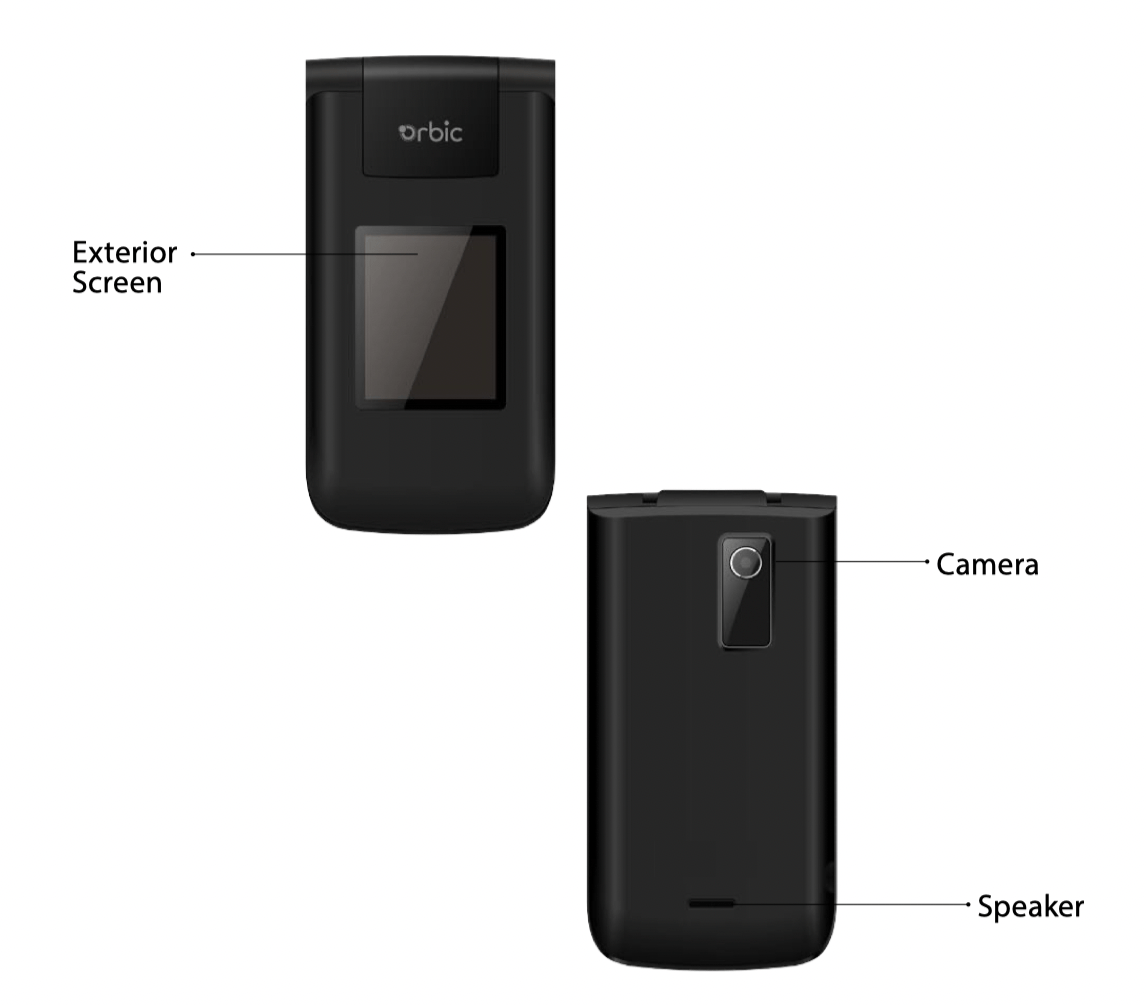
Exterior Screen: Displays messages and notifications.
Camera: To take pictures.
Speaker: Allows you to hear sounds emitted from your phone as well as media content (for example, music and ringtones).

MicroSD Card Slot: Allows you to insert an optional Micro SD card for external memory storage.
Battery: 1,400mAh Battery.
SIM Card Slot: Nano SIM card slot.
Back Cover: Protects the internal components of your phone.
Navigating Your Phone
You can navigate within your phone’s software by pressing the key that corresponds with the action you want to perform or using Navigation key to scroll and OK key to select a highlighted item.

Press the Right soft key to select the item displayed at the bottom Right of the screen.
Press the Left soft key to select the item displayed at the bottom left of the screen.
Press the keypad key that corresponds to the item you want to be displayed in the list.
Press the top, bottom, or sides of the Navigation key to move the cursor.
Press the center of the Navigation key (the OK key) to select the item displayed at the bottom center of the screen.
The shortcut menu displays a list of additional shortcuts, which you can customize to include your favorite features.
Installing the Battery
- With the phone facing down, insert your fingernail into the cutout located on the bottom of the back cover and gently lift the cover.
- Place the battery, making sure the gold contacts are lined up.
- Push in and press down gently to secure.
- Place the back cover and press it down along the edges to close.
Removing the Battery
- With the phone facing down, insert your fingernail into the cutout located on the bottom of the back cover and gently lift the cover.
- Lift the battery out of the battery compartment by using the fingertip cutout.
Charging the Battery
The battery comes partially charged. You must fully charge the battery before using your device for the first time.
Use only approved charging devices and batteries. Using other accessories may invalidate your warranty and may cause damage.
Your device comes with a charger (charging head and USB cable) to charge from any electrical outlet.
- Insert the USB cable into the device port.
- Connect the USB cable to the charging head, then plug the charging head into a standard electrical outlet.
- When charging is complete, unplug the charging head from the power outlet and remove the USB cable from the device.
Tip to extend and improve your device battery life:
Conserve battery power to get the best out of your battery in everyday usage by following settings on select applications:
- Lower Screen brightness.
- Reduce Backlight time.
- Turn Bluetooth and Wi-Fi off when not in use.
- Disable GPS when not in use.
- Enable the battery saver feature.
Replacing the SIM Card
The Orbic Journey V Tracfone comes with a pre-installed SIM card.
To replace the SIM Card:
- Turn off the phone, then remove the back cover and battery.
- Locate the slot for the SIM card and gently slide the SIM card tray down to unlock the tray.
- The SIM is now accessible by opening the tray.

Inserting a Memory Card
- Remove the back cover.
- Position the microSD card with the label side facing up and the gold contacts toward the slot (at the upper-right side of the phone).
- Carefully slide the SD tray to the right to unlock it and place the Micro SD card in place and lock the tray by sliding left.
The microSD cards can be damaged easily by improper operation. Be careful when inserting, removing, or handling it.
The device can support up to a 128GB microSD card. To remove the microSD card, follow the similar steps from the Removing the Battery section.
Turning Your Phone ON/OFF
To turn your phone on or off, press and hold the Power/End key.
Read also: TCL Flip Pro (4056S) User Manual
Convenient Features
This chapter focuses on the most-used features on the phone. Nine convenient features in total may be useful for you. Included, vibrate mode, sounds off, and quick volume adjustments.
Other than that, there are also features for capturing a screenshot, switching between calls, three-way calls, entering text, and changing text input modes.
Vibrate Mode
This feature turns off ringing and sets the phone to vibrate instead.
- From the Home screen, press and hold the Vibrate mode key press OK.
- To return to Normal mode, press and hold the Vibrate mode key again and press OK.
Sounds OFF
This feature turns off your phone’s sounds when you’re in a place where phone sounds could disrupt others.
- From the Home screen, press and hold the Volume down key to set your phone to vibration.
- Press the Volume down key again to set the Alarm.
- Press the Volume down key one more time to select All sounds OFF.
- To return to normal sounds mode, press and hold the Volume up key until the desired volume level is reached.
Quick Volume Adjustment
The Volume key on the left side of the phone can be used to quickly adjust the ringer and earpiece volume.
The Volume up key increases the volume, and the Volume down key decreases it.
Capturing a Screenshot
- Press and hold the Volume down key and the End/Power key simultaneously for two seconds to take a screenshot of the current screen.
- To view the captured image, from the Home screen press the OK key > press Menu > Gallery.
Switching Between Calls
When on a call, a beep will alert you to another incoming call and the Caller ID information will display on the screen.
- Press Send key to answer the call. This action puts the first call on hold.
- Press Send key again to return to the first call.
Three-Way Call
This feature enables a three-way conversation on your wireless phone with two people at the same time.
- Press the Right Soft Key and enter the 10-digit number of the second individual while you are on the first call.
- Select a New call and the Dialer to dial another number.
- Press the Send key. The first person is automatically put on hold while the call is made.
- Once the second person answers the call, press the Right soft key and press the 2 key merge calls.
- To end both the conversations, press the End/Power key.
Caller ID
This feature displays the number and/or name and picture (if applicable) of the person who is calling when your phone rings.
Entering Text
The following key functions are available to help with text entry:
- Right soft key: Press right soft key option > and select a new message.
- Left soft key: Press to change the text input mode.
- Shift: Press to change capitalization (Lowercase, Initial cap, Caps lock)
- Key Space: Press to insert a space.
- Clear: Press to delete a single space or character. Press and hold to delete entire words.
- Key Punctuation: Press to insert punctuation symbols when using Abc text input mode.
Text Input Modes
Press the Left soft key input modes: T9 Word / abc / Abc / ABC / 123 /Symbols
Tools
In the Tools chapter, users can read about the explanations and instructions of the pre-loaded utility apps. You may not notice but the apps are very useful to make your productivity come easier than before.
The utility apps that you can learn here are Calendar, Alarm, World Clock, and Timer. There are also Stopwatch, Calculator, Notepad, and File Manager.
Wireless & Networks
A basic phone doesn’t mean it lacks wireless & network features. You can still stay connected with the world with these features. In the user manual, you will learn how to configure and manage your wireless connections.
This chapter discusses how to activate the Wi-Fi and Bluetooth connections. There are also separate parts that will talk about the tethering and mobile hotspot, cellular networks, and emergency alerts.
Accessibility
The Accessibility chapter is useful for users with personal capabilities and limitations. With this, users can be more comfortable when using the device by setting up their personal preferences.
The Accessibility features available are Readout, Speech Rate, Speed Pitch, and Font Size. You can also change the Color Inversion, Color Corrections, Persistent Alerts, Mono Audio, and TTY Mode.
TTY Mode
This feature allows you to attach a TTY device and communicate with other parties who are using TTYs. TTY phones can translate typed characters into voice. It can also translate voice into characters and then display them on the TTY.
- From the Accessibility menu screen, press the 9 key > TTY mode.
- Use the Navigation key to highlight a TTY mode > press the OK key to select any of the following:
TTY OFF – Users send and receive without TTY equipment.
TTY Full – Users who cannot talk or hear send and receive a text message through TTY equipment.
TTY HCO – Users who can hear but cannot talk send a text message and receive voice through TTY equipment.
TTY VCO – Users who can talk but cannot hear receive a text message and send voice through TTY equipment.

Connecting TTY Equipment and a Terminal:
- Connect a TTY cable to the TTY connection on the phone (TTY connection location is the same as a headset jack).
- Access the phone Settings menu and set the desired TTY mode.
- Check the screen of the phone for the TTY icon.
- Connect the TTY equipment to the power source and turn it ON.
- Connect the phone to the desired number.
- Once connected, use the TTY equipment to type in and send a text message or a voice message.
- The voice or text message from the receiver will appear on the TTY equipment display.
Real-time Text (RTT) Call:
- From the Accessibility screen, press the 0 key.
- Use the Navigation key to turn it ON/OFF.
Phone Settings
The last chapter of the user manual will discover some settings to adjust and customize your Orbic Journey V phone. Find out the tutorials about how to change the phone’s language, how to set the navigation key shortcuts, and how to see the phone’s storage information.
Besides, you can learn how to use the USB connections, transfer music and photos, set the locations by using GPS and set up the security features.
Download User Manual
So, that’s the end of the summary. But, it is not limited to the whole document. There are still a bunch of parts that we haven’t covered yet.
If you want to read the full version of it. Here we go, we presented to you a full Orbic Journey V user manual to download.
Download: Orbic Journey V User Manual (PDF)
